Ninja Forms Connect Setup and Usage Instructions (Ninja Forms version 3 and up)
These instructions are only for users who are using Ninja Forms version 3.0 or later. If you have reverted back to an earlier version of Ninja Forms (v2.9.x), please follow these instructions.
If you have recently updated from version 2.0.5 to version 3.0 of WP-CRM System Ninja Forms Connect plugin, you must follow these steps in order for the plugin to continue creating new records.
Set up the Action #
Ninja Forms 3 includes a new WP Hook Action sequence. This allows the form to trigger an action in WP-CRM System (and even other plugins) whenever a form is submitted.
To set up the action, click Emails & Actions at the top of your form editor and click the big blue + sign at the bottom right side of your screen.
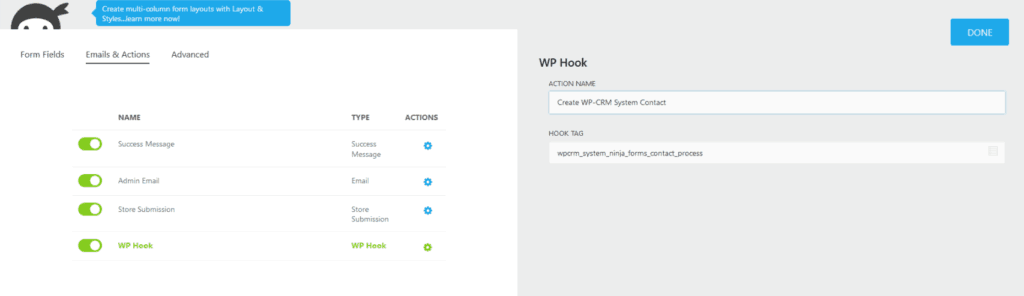
In the top “Installed” section, click “WP Hook”. There will be two fields you need to fill in:
- Action Name: This can be whatever you want it to be as it’s only for reference purposes. Use something descriptive so you know what this action is being used for. Something like “Create WP-CRM System Contact” could work. But really it can be anything.
- Hook Tag: This will be one of the following:
- wpcrm_system_ninja_forms_contact_process
- wpcrm_system_ninja_forms_organization_process
- wpcrm_system_ninja_forms_project_process
- wpcrm_system_ninja_forms_task_process
- wpcrm_system_ninja_forms_campaign_process
- wpcrm_system_ninja_forms_opportunity_process
The hook tag you use will determine what happens when the form gets submitted. Look at the second to last word in the hook tags above. The word you see is the type of record that will be created if this hook tag is used (contact, organization, project, task, campaign, or opportunity).
Click Done when you have finished setting up the WP Hook.
Tip: Repeat these steps if you wish to create more than one record type from the same form submission. For example, you can create a contact and organization all at once by adding an additional WP Hook action.
Form Fields #
Your form will need fields to collect the data that gets passed to WP-CRM System. You can use any field type available in Ninja Forms, as long as the field’s key is set correctly for the field and record you are trying to create.
Find The Field Key Setting #
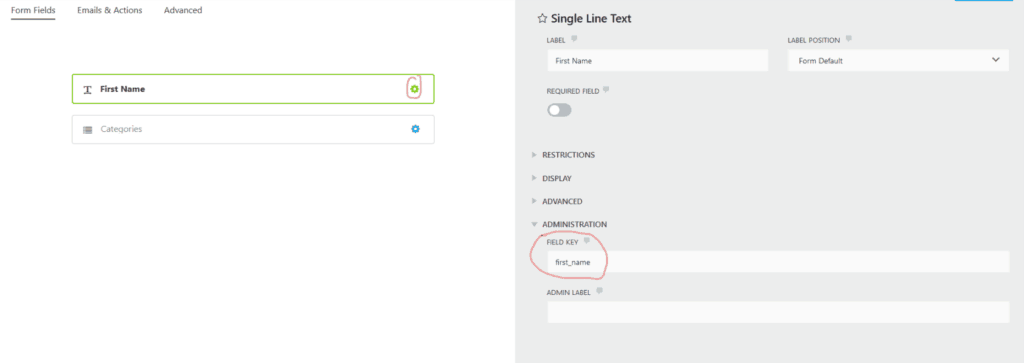
When setting up your fields, click the gear icon to the right of the field.
In the field’s settings section, give the field a descriptive Label. This is what your site’s visitors will see, and will indicate the type of information you want them to provide.
Next, click on the Administration heading (towards the bottom of the field settings) to expand that setting section.
In the FIELD KEY box, you will need to enter the appropriate key for the field. Keys for each record type are provided below.
I Don’t See The Field Key Setting #
If you don’t see the Field Key setting as shown above, you may need to enable developer mode in Ninja Forms. To do this:
- Navigate to the Ninja Forms > Settings page.
- Scroll down to the Advanced Settings section towards the bottom.
- Check the box next to Form Builder “Dev Mode”.
- Click Save Settings.
You should now be able to see the Field Key setting on your form fields.
Contact Keys #
- prefix
- first_name
- last_name
- org
- role
- url
- phone
- mobile
- fax
- address_1
- address_2
- city
- state
- postal
- country
- additional
- categories
- author
Also, click here to learn more about how to use custom fields.
Organizations #
- title
- phone
- url
- address_1
- address_2
- city
- state
- postal
- country
- additional
- categories
- author
Also, click here to learn more about how to use custom fields.
Projects #
- title
- value
- close_date
- status
- progress
- org
- contact
- assigned
- additional
- categories
- author
Also, click here to learn more about how to use custom fields.
Tasks #
- title
- org
- contact
- project
- assigned
- start_date
- due_date
- progress
- priority
- status
- additional
- categories
- author
Also, click here to learn more about how to use custom fields.
Campaigns #
- title
- assigned
- active
- status
- start_date
- end_date
- reach
- responses
- budget
- actual
- org
- contact
- additional
- categories
- author
Also, click here to learn more about how to use custom fields.
Opportunities #
- title
- org
- contact
- campaign
- assigned
- probability
- close_date
- value
- won_lost
- additional
- categories
- author
Also, click here to learn more about how to use custom fields.
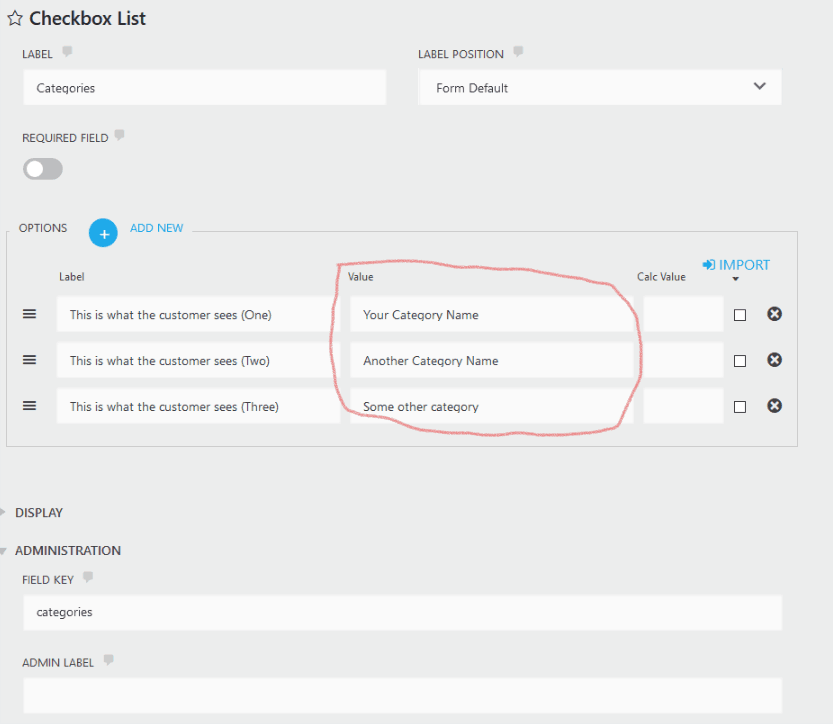
Working With Categories #
Categories are expecting the category name (not the slug). You can find category names inside contact records in the Categories box, or by navigating to WP-CRM System > Dashboard > Select the Category Type from the menu at the top.
You may not want to allow direct user input in a free form text field, as it would not be likely that the user would type the exact correct category name.
It is better to use a select menu, radio buttons, checkbox, or even a hidden field to record the category. In each of these fields, you can define the value that gets passed to WP-CRM System.

Working With Custom Fields #
If you are using WP-CRM System’s Custom Fields extension, you may also use the Field Name for any of the custom fields.
The field name can be found in WP-CRM System > Dashboard > Custom Fields tab. Make sure the “Apply To” setting corresponds to the record type you are working with.
If your custom field type is a Select menu, be sure that your Ninja Forms field setting includes the same list of options that you have in your custom field’s settings.
Predefined Data #
Some fields will only accept certain values. For example, a progress field will only accept numbers between 0-100, skip counted by 5 (0,5,10,15,etc.).
Here are the fields and their expected values:
- prefix: this is a contact’s name prefix. Accepted values include:
- mr, mrs, miss, ms, dr, master, coach, rev, fr, atty, prof, hon, pres, gov, ofc, supt, rep, sen, amb
- status: this is a high level overview of to where how project, task, or campaign is proceeding. Accepted values include:
- not-started, in-progress, complete, on-hold
- progress: this is a percent complete. Accepted values include:
- 0,5,10,15,20,25,30,35,40,45,50,55,60,65,70,75,80,85,90,95,100
- probability: this is chance of winning an opportunity. Accepted values include:
- 0,5,10,15,20,25,30,35,40,45,50,55,60,65,70,75,80,85,90,95,100
- assigned: this is a WordPress user with access to WP-CRM System. Accepted values include:
- User account’s email address, or display name. These values can be found under Users > User Profile.
- priority: this is an indicator of how important a record is. Accepted values include:
- low, medium, high
- won_lost: this is an indication of whether or not the record was won or lost. Accepted values include:
- not-set, won, lost, suspended, abandoned
- active: this indicates whether or not a campaign is active. Accepted values include:
- yes
- any other value will result in a “no” or unchecked value.
For these fields, it is best to use a Ninja Form field with predefined values so that the input provided is a value that can work with WP-CRM System. Fields like select menu, radio buttons, checkbox, or even a hidden field allow you to define the field’s value that will be passed when the form is submitted.
Creating or Using Existing Records #
Certain fields have the ability to create new records if one does not already exist. For example, if you have a contact form asking for the user’s company, a new organization can be created if the value entered does not already exist in the CRM.
Fields that will be created if they do not already exist include:
- org
- contact
- project
- campaign
Date Formats #
Fields that are expecting a date can use any date format provided in the Ninja Forms field setting for dates.
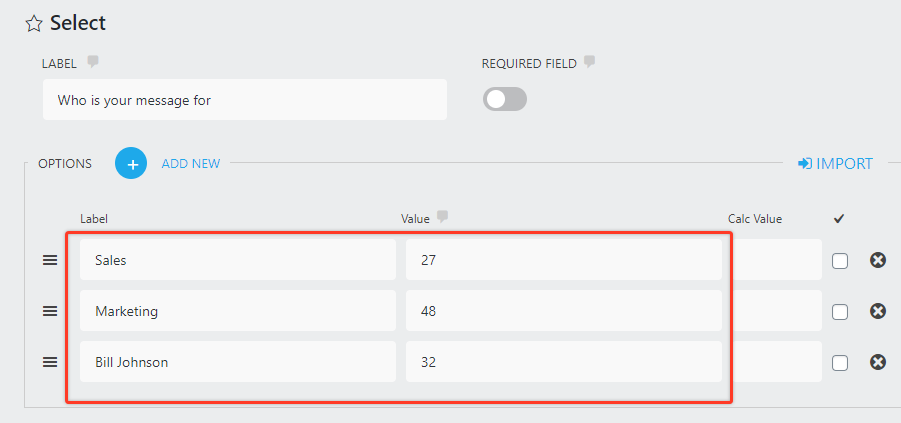
Specifying the Record Author #
If you wish to specify the record’s author, you can use the field key author. The value that is expected is an integer that represents the WordPress account’s user ID of the individual that is intended to be listed as the author. One way to accomplish this is to set a select or radio list field with a list of useful labels such as “Sales”, “Marketing”, “Accounting”, etc. Then assign values to those labels that match a user ID of someone in the appropriate department.
For example, if an employee works in Sales and has a user ID 27, another employee works in Marketing and has a user ID 48, and another works in Accounting and has a user ID 32, you could set up a field that looks like this:
You can also use a hidden field if all entries into the form should be assigned the same author.


